Pages

Monday, June 27, 2011

TwitterB-June

Tiffany chose a print from Lauren and Jessi Jung's Hideaway. I didn't take a photo of mine before I started fussy-cutting, so here is one from Seamstar Handmade:

Lauren & Jessi Jung Hideaway


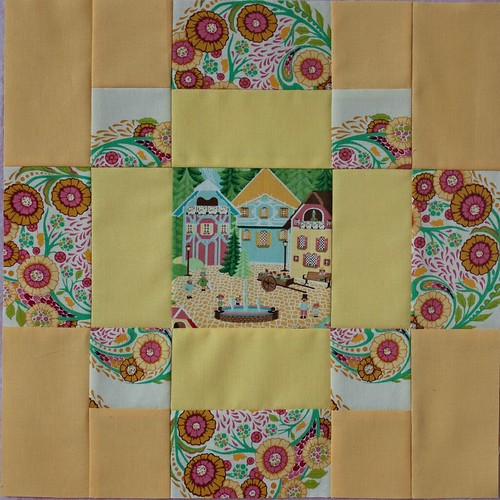
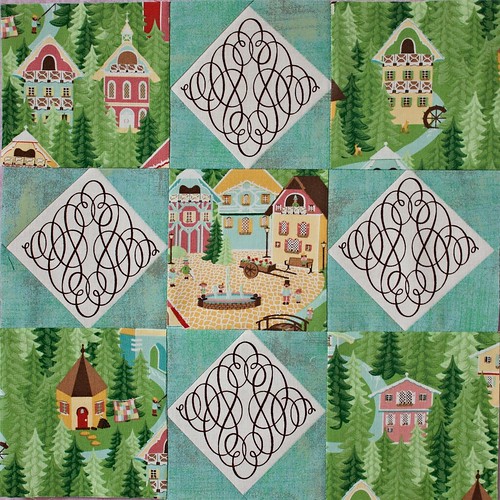
This print clearly calls out for fussy cutting, though I don't have a ton of experience with it! Tiffany wanted 12.5" blocks based on a 9-patch grid that weren't too busy. Perfect, I thought, I'll just take a look at my Block-a-Palooza blocks. There are a number of block patterns from that QA that I really liked, but I didn't find one that fit the simple style that she was looking for. So I googled around and settled on versions of Antique Tiles and Star Cross. Star cross is reminiscent of Block 12 from Block-a-Palooza, which is one that I initially picked out. (I initially also chose Block 3, but decided that the house print lent itself better to the other designs.)

June Twitter B block 1
Antique Tile
June TwitterB block #2
Star Cross
The yellow block includes Kona Sunflower and Buttercup (the lighter yellow) and a bit of Parisville. The blue/green block is a Leannika print and a Basic Grey Grunge fabric from the Blush line, not sure of the name.

How is the TwitterB going, 4 months in? I'm really enjoying it so far. Kind of like the Block-a-Palooza. It's fun to just focus on a couple blocks and not think about a whole quilt's worth and new blocks each month keeps it interesting. We were supposed to make one block per person, but most of us are making two or more depending on block size. I can't wait to see all of the blocks together. I believe we had one member drop out, but I think she was at the end of the cycle. I'm September, so it's not quite time for me to start thinking about my own block, yet...

Can't wait for the July blocks!

Another Bag and a Dress Rehab

Birdie Sling 2

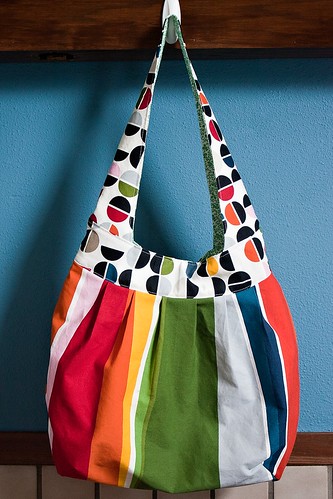
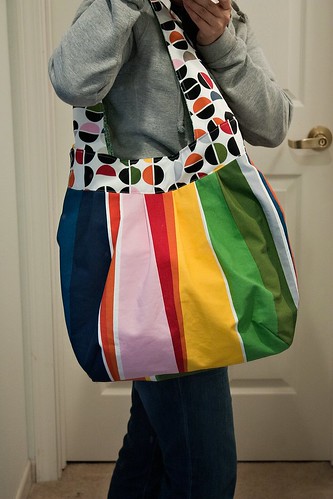
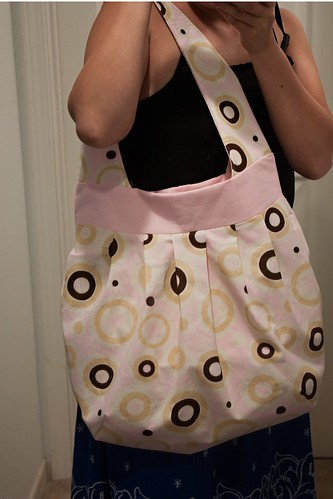
Here's my canvas Birdie Sling that I finished up last week. I think that it looks beachier than the pink/brown one, but whatever my friend wants - that's what she gets! Who gets this one? Not sure. It may make its way out to the Eastern Shore in MD.

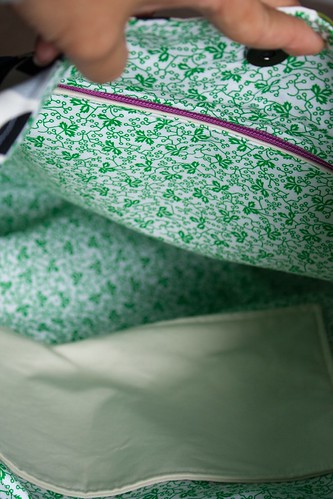
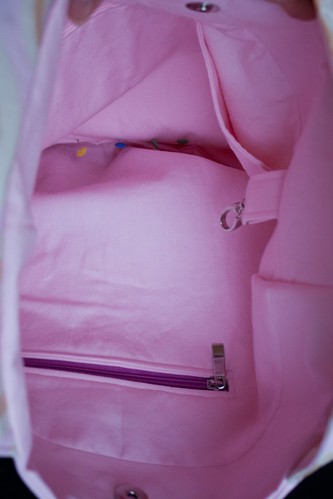
Birdie Sling 2 interior
Interior
Birdie Sling 2
In all its huge-ness!
If you can believe it, I can't remember what I did interfacing-wise on this bag! I think that it's possible that I didn't interface the canvas at all... Oh, I remember. I used medium-weight sew-in interfacing because I accidentally bought that instead of fusible. And I think I used lightweight woven fusible on the lining, instead of fleece. But that's a bit hazy. Great recap, huh?! Oh well. Memory is the first thing to go. Or is it eyesight...?

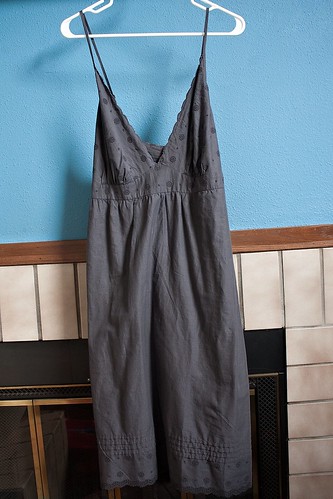
I also stopped by Old Navy on Friday to grab some $2 tank tops (my summer wardrobe staple) and I ended up grabbing a couple other things, as well (falling prey, no doubt, to their nefarious marketing ploy). I found this XXL dress with a broken zipper for $3.20. And I thought to myself - "self, you should make that into a cute skirt."

Old Navy dress to skirt refashion

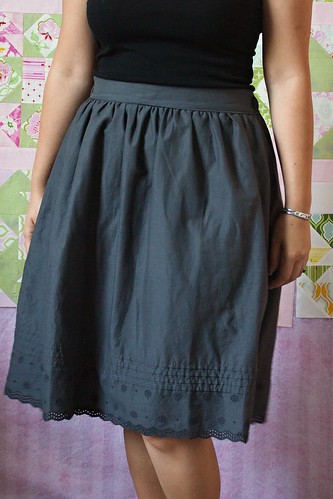
And so I did.

Old Navy dress to skirt refashion

Can't find yardage at that price and it was fully lined with a soft cotton! I think the straps crossed in the back, so the photo above doesn't show just how much fabric there was. There was a small shirred panel at the back, as well. I based it on Anna's skirt tutorial. Even with the double fabric (lining and main) for the waistband, I decided to use the interfacing as well and it lends a little more structure. I really like!

I also pulled out my Block-a-palooza blocks to give them another chance. I starched them and ironed the heck out of them (they were a bit crumpled and rumpled after my first sad attempt at finishing the quilt). And now I'm giving them the good ole Type B treatment. That's right - I'm sashing them in two different colors. Why? Because I didn't have enough grunge fabric in either color to sash it all and I had already linked together two sets of four and I didn't want to do any more seam ripping. Classic.

Finishing up July TwitterB blocks today!

Tuesday, June 21, 2011

Birdie Sling-All but the Topstitching

Birdie Sling

Long BS post. That's BS for Birdie Sling (it could also be BS for well... you know). The pattern is ubiquitous. I bought mine at www.fabric.com, since my LQS didn't have it but it is easily found elsewhere. I did some research before starting, like I do. And I made some modifications based on what I read. Here are a few links to others who have made the Sling and offered their advice: Jennifer @ I was told to get a hobby; Kathy @ Pink Chalk Studio; Make It Modern; and It's a Pretty Modern Life.

Birdie Sling WIP

OK. This is an Amy Butler bag, so it is large. As I mentioned, I'm making it as a beach bag. My husband said, "It doesn't look that big on the hook, but when you put it on, it makes you look really small." Added benefit? No, I'm only 5'2" (and a half!), so it just adds to my hobbit-like appearance. But my friend is taller, so it will be good on her (that's probably why Amy can pull off a big bag because I know she is quite tall herself!). Some people have reduced the pattern with success.

This feels like a pretty substantial bag but not too heavy. I used a pretty thin cotton from Joann's for the outer and the ever-present pink cotton shirting from Hancock's for the lining. I followed the interfacing directions (fleece on the lining, woven on the outer, straps, and band) and I feel they are just right for quilters cottons and lighter. This allows for crisp pleats and some drape to the bag. But this is all personal preference. Some people might prefer it to be more like a hobo or one of those old Esprit bags (you know you had one!) that are pretty flimsy and scrunchable. Others might like even more body. Obviously, either is totally fine, but you have to think about the strength of the bag and the stresses on the seams; the bigger the bag, the more stuff you put in it, the stronger it needs to be.

Birdie Sling pleats

Almost every single blog post about the Birdie Sling says to add a magnetic closure. Who am I to argue with the experienced masses? Magnetic closure - check. One thing noted by Kathy at Pink Chalk is that older versions of the pattern contain an error in attaching the band to the top of the bag body. This could certainly result in more gaping at the top (suggesting the need for a fastener). So, check the link to see if your pattern is correct.

Sometimes with these bulkier bags I have to do what I was told never to do - pull on the fabric from the backside of the needle. Sometimes, though, it just needs that extra little push.

Birdie Sling inside

Graduated to zippered pockets! They weren't even that hard and it adds such a nice finish to the project.  I thought there should be some place for valuables. Then I added a nice big pocket for books, sunglasses, and sunscreen. I also added a key clip. Keys are so easy to lose in larger bags!

I added about 4 inches to the strap pattern. A normal person might put the seam midway between the strap pieces, but I staggered mine. I just thought (perhaps wrongly) that it would be less stress on the seam if it wasn't directly at the point taking the brunt of the weight. I extended the strap piece B by 4.5" inches on the straight part. Also, the part of the strap that connects to the band is slightly concave (convex?), which is a little tricky and a bit bulky, but it's a nice detail.

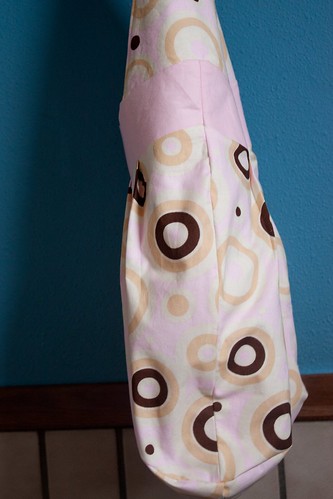
Birdie Sling gussets
Gusset

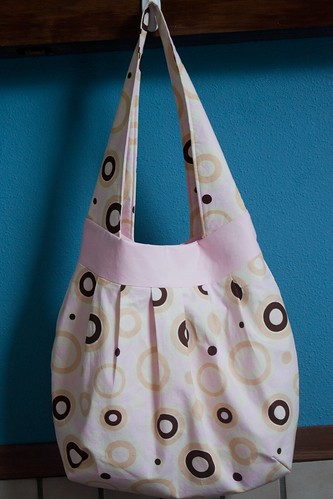
I already have all of the pieces cut out for another one. (I had a color crisis and decided that the pink/brown fabric might say "baby bag" more than "beach bag" and my friend wouldn't like it, so I cut out a bold primary print, as well. I ended up sending her pics of the fabric and she picked the pink one, anyway!) This one will be made out of homedec canvas, so I'll be mixing up the interfacing and playing with strap length.

The bag obsession continues...

Thursday, June 16, 2011

The Highbrow Hobo

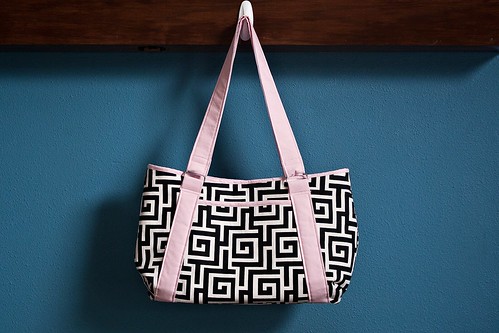
Highbrow Hobo

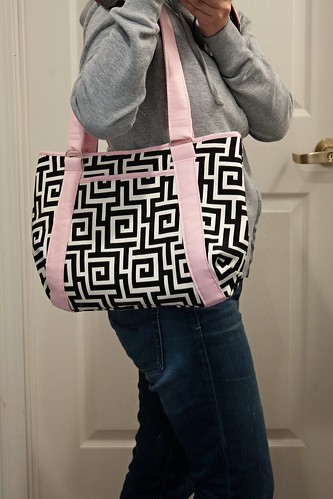
For some reason I keep calling this the Highbrow Boho, which doesn't make much sense. This is the Highbrow Hobo, a PDF pattern from Lisa Lam at U-Handbag. I don't have a lot of bag/purse making experience, but I found it to be an easy-to-follow pattern and I really love how this turned out.  I will definitely try it again. Generally, I'm just winging it (per my usual), but here are my notes for what they're worth.

I made this bag over three days with many breaks and interruptions. I cut out the parts and fused all the interfacing in one evening. I had to run out for hardware and pink thread the next day and started assembling the inner and outer pockets. Final construction and top stitching on the third day. All this to say, I'm not sure how long it would take to make one.

The outer fabric is a homedec weight cotton that I bought at Joann's. The accent/lining fabric is a 100% cotton shirting that I bought at Hancock's for 95 cents a yard.

Highbrow Hobo

The pattern calls for fusible fleece and woven interfacing to be fused to the outer fabric. I have been playing around with the placement of interfacing in bags. I know that some people do not care for fusible on the outside fabric because of wrinkles. I really think it depends upon the fabric you're using and the look you are going for. This bag doesn't have pleats and it is not designed to show off the drape of the fabric.  This is a somewhat structured bag that holds its shape, so you could even make it more rigid by using heavy-weight fusible. Lots of interfacing advice from Lisa herself and some great tips from Kathy at Pink Chalk.

Because my outer fabric already had more body than quilter's cotton, I wasn't going to fuse both types of interfacing to it. With the 241 Tote, I've been putting fleece on the lining and the woven interfacing on the outer, home dec fabrics. That way, the bag has a little structure and shape, but the outer fabric isn't overly stiff.  For the Highbrow, I reversed that and put the fleece on the outside and the woven on the lining. I just like the idea of having a little reinforcement on the lining. In retrospect, I think that I might cut the fusible 1/4" smaller than the outer bag pattern and also use woven on the outer fabric when using home dec weight fabric because the has a little wider weave than quilting fabric and there is a considerable amount of stress at the bulky seams, meaning it's a little more likely to shred. (Wow, run-on much?!) If I were to make this in quilting cotton, I think I would do woven interfacing for all inner and outer pieces and fleece on the outer pieces.

Part of the challenge in this project (like many bags) is bulk. So, I had to fiddle with needle size and stitch length. I think it's probably about knowing your machine. My machine (the Craigslist Wonder) doesn't really like to deal with bulk. I have somewhat adjustable presser foot pressure, so I dialed it down to the lowest amount of pressure. I started out using a denim needle, but my machine was skipping stitches like ca-ray-zee. When I moved back to a universal 14 needle, it was better. It didn't skip stitches, but it did get hung up in places, making the stitches very small. At some of the bulkier spots I used a 2.5 stitch. I didn't want the stitches to be so small that they acted like a perforation. So, that's just something to watch for as you are going forward.

Other alterations: I used D-rings instead of O-rings. I saw some cute black rectangular rings (oxymoron?) but went for the slightly more economical option instead.

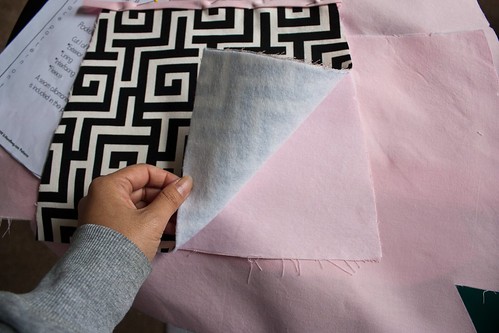
Pockets: The pattern calls for 1 outer pocket. I made this for my sister-in-law who has an almost 2-year old, so I know pockets are a premium. So, I made two outer pockets. The pattern piece makes a deep pocket that runs almost the width of the bag. so, I shortened one of them, like so:

Highbrow Hobo outer pocket construction

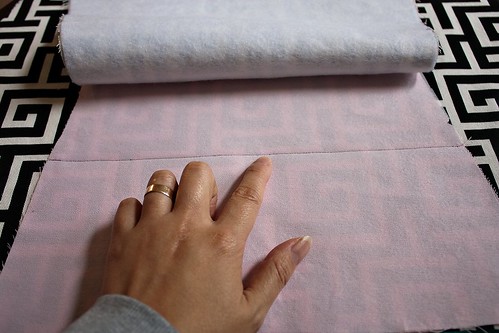
The outer fabric and lining fabric for the pockets are sandwiched and connected by double-fold bias binding at the top. For the shorter pocket, I flipped up the outer fabric of the pocket and stitched the lining pocket fabric to the outer shell of the bag (the black and white fabric in this photo).

Highbrow Hobo outer pocket construction

Then I folded the outer pocket fabric down and attached it to the bag shell as instructed in the pattern.
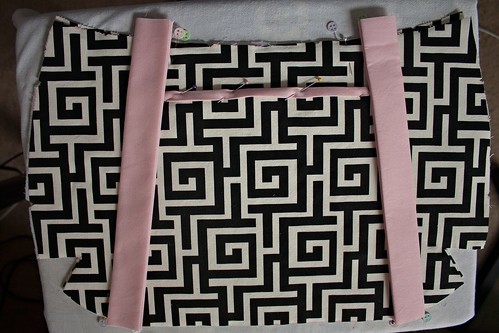
Highbrow Hobo
This is just a mock up - I stitched the bias binding on before stitching the short pocket

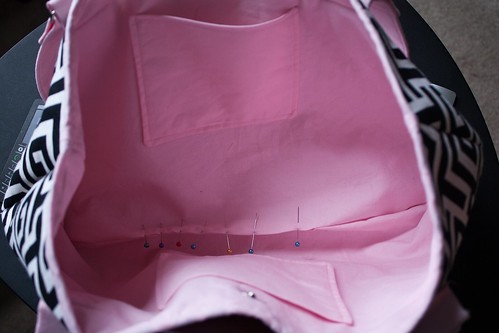
I attached the bias binding by stitching on both sides like so, rather than just the one line of stitching (I tried it that way once but my stitching was really bad, so I did it the traditional way and it looked better). I also added two inner pockets (haven't graduated to zippered inner pockets, yet).

Highbrow Hobo inside

Topstitching: I think if you used two quilting cottons, you would be able to stitch in the ditch more easily. But the pattern calls for pulling up the lining fabric and then stitching in the ditch to create the contrast a sort of pseudo-piping. Because of the weight of the outer fabric, the lip of the seam was inverted from what is shown in the pattern. So, instead of stitching in the ditch, I just topstitched around the pink and it somewhat mirrors the topstitching across the pocket pieces and the straps. I noticed on Flickr that some folk omitted this step or just topstitched around the outer fabric. Another thing you could do is just use pre-made piping.

Highbrow Hobo

Continuing my bag-making frenzy, I just jumped on the bandwagon (a couple years late) and ordered Amy Butler's Birdie Sling to make my friend a beach bag. I will definitely be documenting that process here in the near future.

Must now make some decisions about Father's Day gifts. I'm thinking about burlap coffee bag aprons. Sewing for men is so hard...

[News update: at a time when things in my non-crafting life (the so-called "real world") are a bit stressful, I have had extraordinary giveaway luck.  I'm starting to feel guilty.  Thank you, Corey & Hawthorne Threads, AnneMarie & Swell Cloth, and Kaye & Fat Quarter Shop! Your generosity has really brightened my days!]

Tuesday, June 14, 2011

Mail Call!

Moda Bake Shop Prize

"Wait a minute Mr. Postman/woman/FedEx person/UPS deliverer...)"!

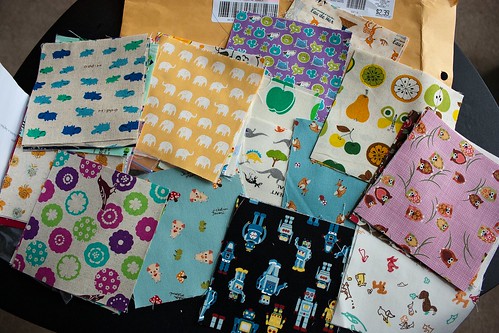
Last week was an awesome mail week for me. Firstly, I received my charm squares from the Japanese Imports Swap! So many amazing squares.

Japanese Import Swap
I thought that I might do a couple of peek-a-boo type I Spy quilts with little flaps for my toddler nieces/nephews. But I have so many projects on my plate that I'm not sure yet.  AnneMarie, who hosted the swap and helms the Gen X Quilters ship, is going to host a sew along with her squares in late summer and I might be ready to tackle them, by then. Until that time, I'll just take them out and gaze at them :)

Japanese Import Swap

AnneMarie also included a list of everyone's fabric line and manufacturer in case we wanted to look for more of a certain print.

Swell Cloth package

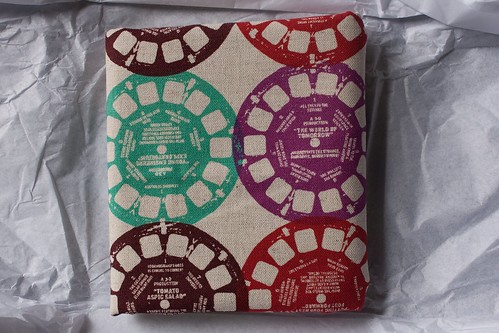
I also splurged on a couple cuts of the viewfinder fabric from Ruby Star Rising. This was my first time purchasing off of etsy (long-time lurker, first-time purchaser). I ordered from Swell Cloth on the afternoon of June 7th and I received the package in the mail on June 10th!

Swell Cloth fabric
At the same time, I ordered a half yard of the viewfinders in the pastel colorway from Sew Deerly Loved (Kerri, the shopkeeper blogs over at Lovely Little Handmades) and I received a note today (Saturday) that it's in the mail! (Estimated shipping times are fully explained in her shipping policies.) I cannot wait to make some awesome zippered pouches with this!

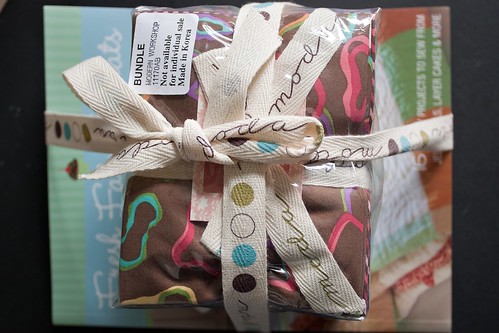
Remember back in February (yeah, I hardly do either...), when I won the Moda Bake Shop Progressive Dinner drawing? Well, part of my prize arrived on Friday! I received the book that launched the progressive dinner journey Fresh Fabric Treats - I actually had a chance to take a look at it in person at my LQS, Stitcher's Crossing* last weekend - and a fat quarter bundle of Oliver + S's Modern Workshop!

Moda Bake Shop prize

I may be getting a delivery of more precuts, but this alone is such a huge treat! I am giddy and thankful all over again!

IMG_1782

In other postal news, I also received the focus fabric for the June TwitterB blocks, which is a cute print from the Hideaway line. Can't wait to get started on that, as well! Didn't snap a pic, but I'll blog the blocks as I finish them.

And in future postal news, I just got word that I'll have another package arriving from Swell Cloth, because AnneMarie drew my name in a giveaway drawing! (Actually, AnneMarie's post led me to Swell Cloth in the first place - so these sponsored giveaways really do work for ad purposes!)

So, while I'm having a little stress in my job situation right now (thanks Minnesota Legislature!), I have been super lucky on the mail front. And winning giveaways! I should definitely buy a lottery ticket. Maybe I'll have a little giveaway to share the fabric love, as well.

I'll keep you posted (ha ha ha!).

*Side note on Stitcher's Crossing. Can't give a thorough review of the shop, but I have been there several times and I've never purchased anything. The last two times I went there, they didn't carry what I was looking for (the Lil Twister tool and any Amy Butler bag patterns) and I ended up buying on line. That said, I believe that they have a really great variety of fabrics, notions and also has knitting and crocheting tools. So, if you're in the Madison, WI area and want to take a look, I encourage you to check it out!

Monday, June 13, 2011

They Say It's Your Birthday {Present}

IMG_1750
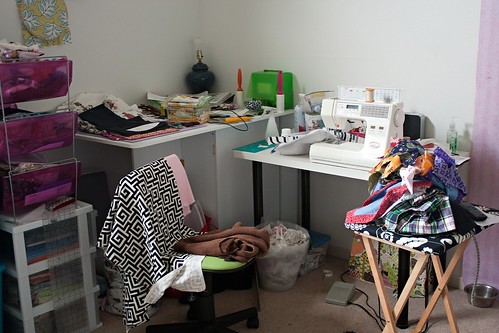
Yes, that is the extent of my ironing board - a TV tray ironing board...

This is my sewing corner. Fear not. There hasn't been an explosion in my sewing corner... unless you mean an explosion of sewing!  My husband (and canines) have been nomads for two years, bouncing amongst three states. So, I've been sewing where I can, when I can. Currently, it's a corner of the living room. 

In my immediate family we have 13 birthdays between June 1 and August 25. Add in Father's Day and both sets of parents' wedding anniversaries and summer is just one big party! (And of course there is one May and two Septembers in there, as well!) So, I need a lot of presents and I'm trying to make the majority of them using things I have on hand. (Sometimes I look at my fabric stash and I think of my even larger fabric stash in the storage unit in Santa Fe, and I get a bit panicky at all of the fabric I own!)

So here's what I've been working on:

Burda 9652
Pre-snaps. I had a rogue snap part, so there's only 1 per strap.
The pattern calls for 2 per strap.

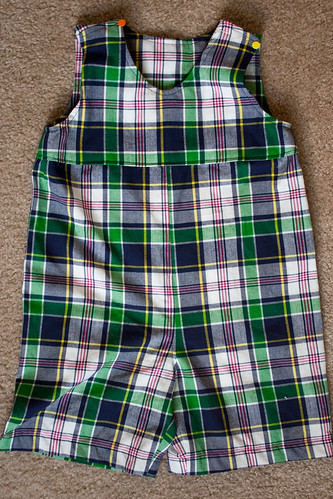
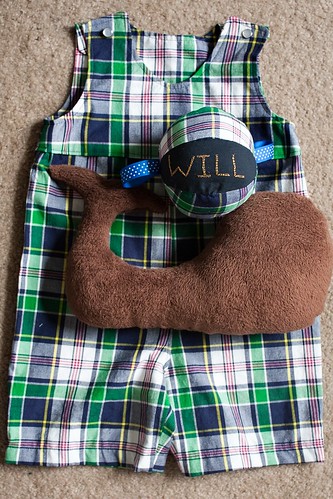
This is a belated birthday gift for my 1 year old nephew. This is from the Burda 9652 pattern. I'm really proud of it. It's the 12 month size. Some of the reviews I read thought the pattern ran a bit big, so I went with the 12 mo, but I suppose it really depends on the baby. To me, the torso seems quite long, but maybe with a baby belly and a diaper, it all works out. The pattern is for a pants jumper but since it's summer I just took a couple inches off of the bottom and made a longer hem, so they should be shorts. 

Nephew's Birthday present

I added a whale softie that I free-handed on a couple pieces of paper. I was going to put an eye on there, but I think he looks just fine without it. Speaking of long torsos, I gave him quite a long one! But he's made of soft minky and will be good for cuddling.  And then just another fabric ball.

These are some bonus shorts for my almost 2-year old nephew (the 1-year old's cousin). 

Shorts

"Bonus," because I had enough fabric from making the jumper to make these shorts! I didn't match up the plaid too well, but between these two projects I was patting myself on the back. No idea if they'll actually fit the children they're meant for, but you know... minor details :)

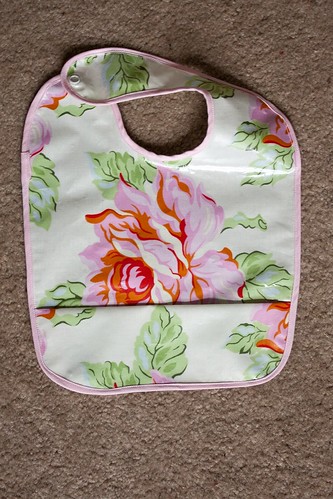
I also had a new niece born last week (yep, two in a three week period!), so I'm thinking about getting together some presents for her. As I was coming up with ideas, I came across some tutorials on bibs and I picked this one to try. In my blog travels I also came across this post on laminated cotton from Dukes and Duchesses. I'd been planning to make these candy wrapper bags eventually and so I had some iron-on vinyl on hand already and I was able to make my own laminated cotton!

IMG_1764

It turned out great for my first try. All I could think was - Man that neck hole is small! But the pattern tutorial showed a photo of a 12 month old and a 4 year old wearing it. But, a bib is not too practical for an infant, so I grabbed a couple XXL men's t-shirts at Old Navy this weekend to make some burb cloths from Rae's tutorial. I've made them from flannel in the past, but I thought I'd give these a try.

I also finished another 241 Tote in Ikea fabrics and Kona Ash. I made the strap a little longer so it could be a cross-body, too.
241 Tote in Ikea Fabrics

And the piece de la resistance, the Highbrow Hobo from Lisa Lam at U-Handbag

Highbrow Hobo
I know, I know... these in-the-mirror shots are kinda embarrassing...

I made this for my sister-in-law for her birthday. I'm going to write another post on the how's and why's of putting this bag together. To sum up, I think it's a great pattern and it's just the right size! Definitely recommended.

Monday, June 6, 2011

Naked Bed Challenge


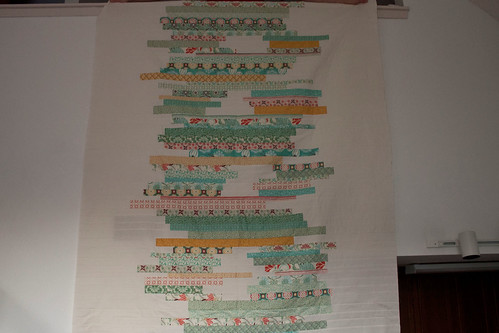
I finished my quilt top for the Naked Bed Challenge with only hours to spare. First I had to figure out what 5PM Australia Central Standard Time is in Madison, WI. Google is so helpful, I tell ya!

Anyhoo, I got some late night photos (think... 11:45pm) and uploaded them to Flickr shortly after midnight and sent an email off to Sarah. So I think I snuck in under the wire!

Naked Bed Challenge 1


As well as several others I've seen floating around cyber-space. I decided to include solid print (oxymoron?) strips and 20 strips where there are two prints and a space between. I really like the stack-of-books style quilts and it would have been nice to have two large columns, but I decided to mix it up a bit.

As I mentioned, I used a really haphazard method of piecing. I had two Moda Scrap bags, which contain a variety of strips left over from cutting pre-cuts. So, they run along one selvage. I trimmed the selvages and each pieced measured about 30-31" with variable widths. I took a strip of Kona Bone (WOF) and sew both ends to both of the ends of Fandango strip, creating a ring. Then I made a random cut on the solid and voila - one strip of the quilt.

Naked Bed Challenge 2

It measures 72.5" x 80" and it is really just right for a full/double bed. Look how nice and not wrinkly it looks here...

I tried to take some daytime photos today, but lo and behold, the quilt is now creased and wrinkled from being folded overnight and most of Monday. I cannot win!

Naked Bed Challenge3

In retrospect, this method of piecing was a bit nutty and I should have trimmed each strip individually. As it was, I had to square up the quilt after I had all the strips attached to one another.

I don't recommend that method with a quilt this size :)

Naked Bed Challenge4
We had to turn the air conditioning off for this (90+ degrees today!) - see the vent?  Classy photo, I know!

All in all, I'm happy with it. I'm contemplating the backing and maybe, just maybe, a piano key border?
Nah. :) Stick a fork in it. It's done.

I gotta crank some birthday presents out and start a new quilting project!