Pages

Thursday, December 22, 2011

End of December Countdown!

More Christmas presents

I'm still making drawstring bags. I was able to sew up seven (7!) last night. (I did the cutting on Tuesday evening.) I only have one more, I think. I am waiting for my last Amazon.com order to trickle in (perhaps in today's mail!) to decide which size bag it will require. I love Amazon. I bought 90% of my gifts from them and when I get a package in the mail, it's like opening a present for myself, even though they're presents for other people.


More Christmas bags


I love Laura Gunn's poppy fabric. I had one yard and I already made a bag out of it. I was able to fussy cut this bag as well and that might be the end of it. But I hated to cut it up. I procured a Wii for myself and my husband (we are sooo not early adopters) and so, perfecting my MarioKart racing has kind of taken priority over sewing :) These bags-as-wrapping-paper are really all the sewing I'm doing for the holidays. Ahhh, the Cameo print from Parisville - another great one that calls out for fussy cutting.

More Christmas bags

And I am waaaaay bee-hind (get it?!) on bee blocks for the first time since starting the TwitterB was almost a year ago. I have a couple challenging fabrics to work with and I'm quite undecided as to how to approach them.

TwitterB November

November's fabric is this Amy Butler print from the Soul Blossoms line. The mint green is throwing me for a loop and I've sort of latched on to the orange/pink facets, as I'm auditioning fabric (although I am thinking about using some of that left over Cameo print from above, as it seems to go with it).

TwitterB-November audition

This butterfly print is the December focus fabric. It also has metallic thread... The December quilter picked Oh Fransson's Scrappy Hedgerow. I am thinking the best way to use this is to fussy cut a butterfly for the center since a 1.5" strip sort of chop up the motifs... We'll see. I have to focus on November first.

TwitterB December


Hopefully these will go out early in the new year. We had one member drop out, so I believe January will be the last month. I am not sure I received all my blocks, but I am going to try to get them together in a top by the end of January, so whatever I have is going in. I have one block that I'm still trying to decide whether to leave out or to unpick and re-sew...

Anyhoo - Happy Holidays to everyone. Enjoy this time with family and friends. New posts in the new year (unless I get those bee blocks done before Jan 1 :))!

Monday, December 19, 2011

Giftwrap Alternative!

Christmas presents wrapped!

Have you seen Jeni's tutorial for drawstring bags? If you are an avid blog reader or Flick user, you've probably seen versions all over the interwebs. And I am here to add to it! Jeni also offers a pattern to purchase with 7 different sizes and a formula for creating custom-sized bags.

The tutorial for one size is free on her blog. More enterprising folks who want to do more math could probably figure out how to enlarge and reduce the pattern, but I wanted to help a sister out (Jeni offers a lot of free content and lovely photos, which takes a lot of time!), so I bought the pattern. I've already made six bags of three different sizes and I feel that pattern has more than paid for itself.

Drawstring Bags

I'm the annoying aunt that gives books at Christmas and birthdays :) Well, until you are a teenager. Then you get a giftcard because I know that's what you really truly want - freedom to choose your own things. But the babies and the 9-year-old get books. And what better wrapping paper than these cute bags! The bags above are two "Project Bags" and one "Artist Bag" (the robot one). (Wow, do I tie terrible bows!) To give you an idea, the green/yellow/purple grass bag has three paperback chapter books and one Diary of a Wimpy Kid hardcover. I think I fit five or six board books into a different Project Bag.

Drawstring Bag

The Artist Bag (iron included for size reference) holds larger picture books that wouldn't fit in the Project Bag. Actually, I think the bag in the photo is tilted a little, so it is taller than it appears here. You could probably fit three irons into this bag!

I took this as an opportunity to use up some fabric that I thought I probably wouldn't use in quilts. They were either impulse buys or parts of assortment sets. They are still lovely; I just don't see them in any quilts I have planned right now. This is a great green alternative to wrapping paper, though if you are wrapping presents for lots of people, I can see how this would be a challenge :) But like any other gift bag, it has a lot of re-use/recycle/re-gift potential! Unlike another gift bag, it probably won't tear in the present melee come Christmas day! (And since I didn't use traditional Christmas fabrics, they aren't holiday/occasion-specific!)

Bias tape maker

You can use ribbon for the ties, but I really like the fabric pulls. I have this handy-dandy 1" bias tape maker that makes the process go pretty smoothly. The only thing is, my machine doesn't like to run over the bulk at the beginning of the tie (where the edge is folded over), but it's no big thang. Still looks cute.

Drawstring Bag

This is the largest size - the Laundry Bag. I have a sweatshirt and a long-sleeved t-shirt in there and it's still pretty roomy. I think I could have gotten away with an Artist Bag here, but I'm happy I got to try out another size.

Drawstring Bags

I am giving a number of Wii games - no, not to the kids - to my parents! So, I'll be making several of the DVD sized bags and a couple of the smallest bags for giftcards, as well.  Just have to determine which size would be right for two Wii wheels... 

Make this pattern! You will love it!

Friday, December 9, 2011

Diaper Bag Delivered!

Diaper Bag


I was able to deliver the diaper bag to my friend last weekend, as well. She is due in mid-January, so I am glad that she will have it when she needs it.

I initially thought I would make a modern funky diaper bag a la Amy Butler (seen here, here, and here). But there's a lesson here: know your audience. I volunteered to make my friend a bag and I asked her what she wanted. I have known this woman for 20 years. She has wanted a daughter for all her life and her aesthetic is not "funky" or "modern." So, I really should have known better :)

I sent my friend some links to fabric shops to get an idea of what she was looking for. She really liked the palette on a minky she found that was pastel pink, brown, and green dots on white. I thought about it for a long while and looked and looked for fabrics that would work. I wanted to use home dec for the outside because diaper bags get so much abuse. But there just wasn't anything in that vein. Lots of pink and grey, or brown and green, but not pink, brown, and green pastel.

I ended up chosing two Premier Prints for the outer - dots and a solid brown. I couldn't find anything in the pastel palette she preferred, so I had to go for a deeper palette. For the lining and pockets, I picked regular quilt-weight cotton. The background is magenta Moda Bella and some stripes, but I can't remember the maker. All fabric came from fabric.com (I'm a girl on a budget and my friend respects that!).


This is a definitely a big bag! I used this pattern from the Warehouse Fabric blog. I did my standard messing-with-a-perfectly-good-pattern thing. I decided not to make a divider because if you are stuffing your bag with receiving blankets, diapers, and extra sets of clothes, I thought the divider would just get in the way. I also did not use homemade piping. I was able to use up brown and green scraps from other projects that just happened to work with the palette my friend chose.

Diaper Bag


I still could have made the Amy Butler bag, but my friend requested a zipper and since I only have magnetic closure experience, I wasn't sure how that was going to work out or if I could do it. I knew I couldn't figure out an alteration to the AB bag, so I am glad that the Warehouse Fabrics tutorial is available. For the zipper, I did the Google, as they say (what? only me?), and came up with several tutorials on recessed zippers. If you are looking to do the same, I perused posts by My Spare Time, Projects by Jane, and Arm Candy for You. Instead of connecting the zipper panels to the seam that joined the outer and lining, I decided to go with Lisa's method, similar to the one posted on her blog. She describes a different one in her book, The Bag Making Bible, which is easier and does not require you to take the zipper apart. That is the one I chose to use, since I happen to have that book at home from the library right now! Not perfect, but serviceable.

Diaper Bag


I mostly topstitched in variegated pink thread, but I used brown on the zipper. Not sure I would do the same the second time around, but I thought it would be a little stronger. Also, I tried to topstitch around the opening of the bag and under the strap pulls, but now I'm thinking I should have run over the top of them... Ah well. I also altered the straps/outer pocket arrangement. Firstly, I added pockets on the short sides - can't have enough of those. Then, I was concerned about the original design having all the stress of the weight at the seam joining the outer and lining panels. So, I made an executive decision and ran the straps outside the outer pockets and attached them at the bottom seam. This made the large outer pockets into smaller pockets, but the skinny ones are perfect for a bottle of water or some butt paste!

Diaper Bag


I interfaced the heck out of this one. Because the outer home dec fabric had a lot of body to it, I ended up just using lightweight interfacing to reinforce the weave and give it a little more durability. I used fusible fleece under lightweight interfacing for the lining, since those fabrics were quilting cottons and I wanted the bag to be scrunch-able but also keep its shape. For the bottom panel of the bag, I used fusible fleece and a piece of Peltex-style interfacing to make it sturdy.

Inside there are a ton of pockets. There are two elastic ones on the short ends and then a long straight pocket divided into smaller pockets and a set of divided elastic pockets facing the straight pockets. My only concern here is that the pockets are a little limp(?); they aren't fully flush with the sides of the bag. They could also be a leeeetle taller. The instructions for making the elastic pockets leave room for you to determine the length of elastic. I think I ended up testing out different lengths and then just chopping some off before sewing it up. I added a small zipper pocket - again, the brown topstitching (ugh). I think the goal of the zippered pocket is not to have the lining fabric show near the zipper, but the stripes make a cute frame, I think.


Diaper Bag

My friend has a 7-year old son (7, right?!) and I thought this would be a funny book for him. I think he's probably pretty excited to have a sibling, so he's not actually concerned that it's a girl :)

Diaper Bag fillings

Of course, a long-awaited little girl needs some pink things. My friend loves dance and I found this precious pink leotard at Old Navy. Then a couple warm pajama-type oufits. The newborn one with the elephants has the little flaps that fold over to keep the baby from scratching herself. So helpful, so cute!

Diaper Bag fillings

Bag filled and ready for delivery!

Diaper Bag

Hope it works out! Very excited to meet the little on in January!

Now, I seriously need to work on my Twitter B blocks because I am way behind. I'm taking advantage of the fact that the November person is away from home for several months! Plus, there are Christmas bags to make using Jeni's tutorial. And slippers to make...

Wednesday, December 7, 2011

December Surprise Delivered!

My Better Half quilt

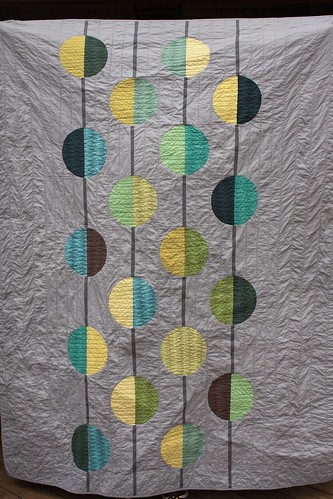
This past weekend my husband and I attended our friends' wedding reception and we delivered their wedding quilt. And now I am sharing it with you! [This is a looooong process post.]

This quilt is obviously a version of Ringle and Kerr's Love Beads, from the Modern Quilt Workshop book. I borrowed it from the library, so I do not have a good photo of what the quilt originally looked like, but you can follow this link, where another quilter has helpfully taken a photo of the original. I have loved this pattern from the moment I saw it, but knew that I did not have the skill to attempt it (the book is from 2005). But with a number of years of quilting under my belt and an upcoming wedding, I knew the Love Beads would fit the bill.

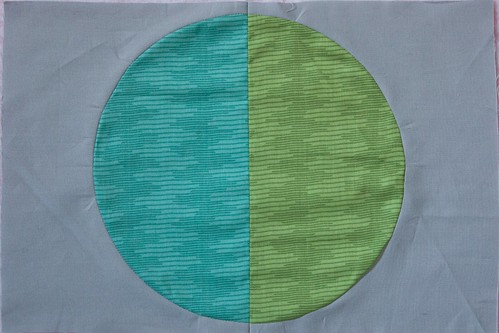
This was my first real attempt at curved piecing (I did two Single Girl sample blocks). So, I did what every pattern suggests you do and what I never do, which is make a test block. Good thing, since I messed it up :) Here's the evidence:

December Surprise Sample Block

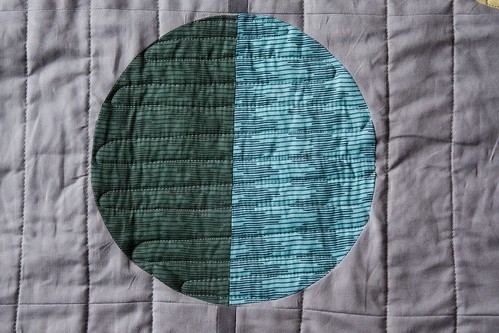
I was so pleased with my circle until I realized that my rectangle was too short. There are two templates: one for the half circle and one for the rectangle into which the half circle is set. But the rectangle template is only for cutting out the negative half-circle space. It is not the actual size of the finished half-circle rectangle block (does that make sense?). So, if you cut out the half circle and then cut the block to the 90 degree edge of the template, you've made your block incorrectly. Done and done. Yea for sample blocks. Lesson learned. Properly made blocks below:

December Surprise WIP

Also, I watched the youtube video on piecing curves without pins, but I couldn't get it to work out right and I went with the pin-like-crazy method. Even then, things didn't go quite as smoothly as I'd hoped. There were I few that I had to unpick because my seam allowance was a smidge too small, meaning that my rectangle blocks bulged out where the half-circle was inset. But I got a lot of practice and I think I'll be a little more confident the next time I try it.

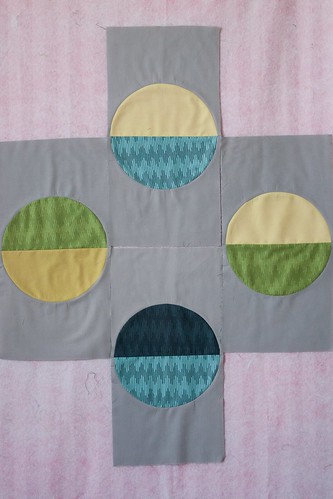
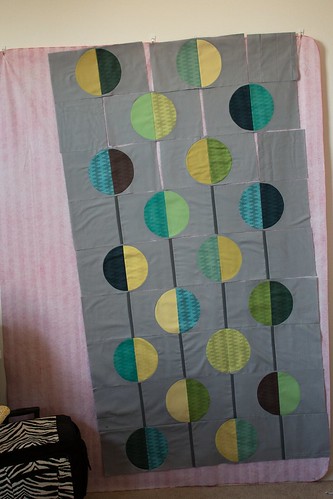
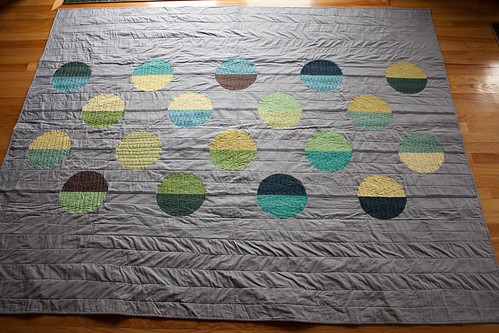
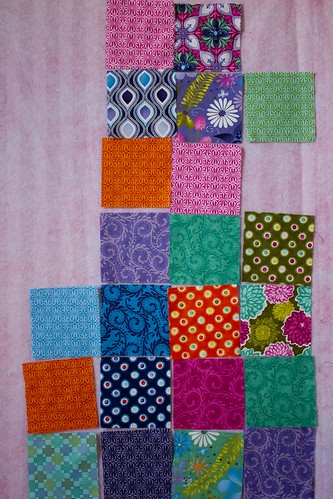
I fully intended to follow the pattern and have the beads strung horizontally. But as I was arranging the circles on my design wall, I had to turn them 90 degrees so that they would fit (the width of the quilt being wider then my design wall). [Don't adjust your screen, they are on my design wall horribly crookedly!]

Love Beads in progress

As I was looking at the blocks with the strings hanging vertically, I decided that I really preferred it (in keeping with Ringle and Kerr's 60's theme, the vertical strings also look like those beaded door thingies!). So, once again, I changed things up a bit. Since it was a wedding quilt, I decided to call my version, "My Better Half" and make one of the circles out of the same fabrics to represent the newlyweds.

My Better Half quilt - detail

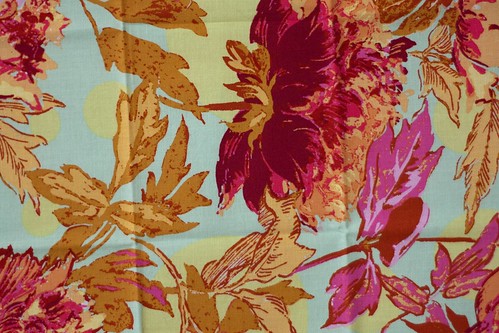
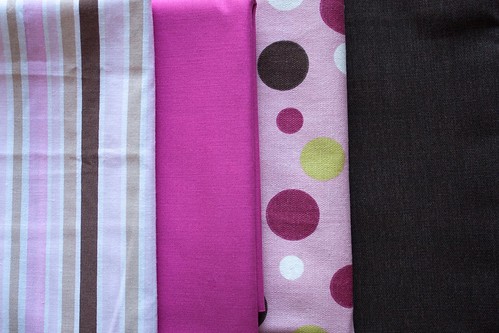
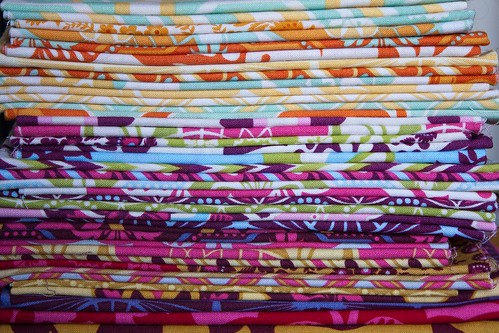
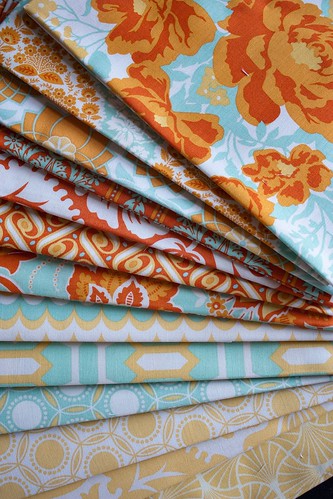
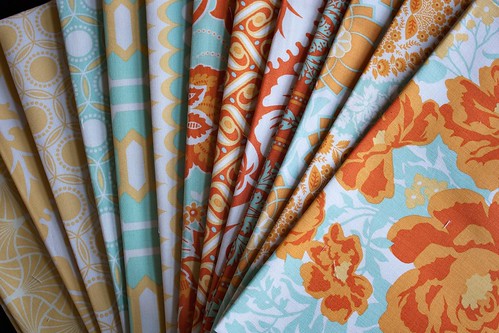
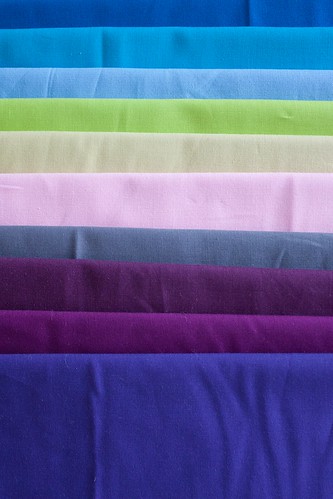
Speaking of fabrics, the background is Kona Medium Grey (a classic) and the print half circles are the Line Blenders from the Brooklyn Heights line from Benartex. I also used some Konas as well (artichoke, possibly celery, and a yellow, I ended up not using the blue from the photo below and using Coal for the "string" instead - Color Consultant/husband contribution).

Selections for new project

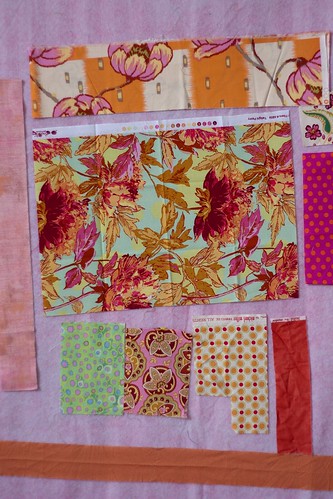
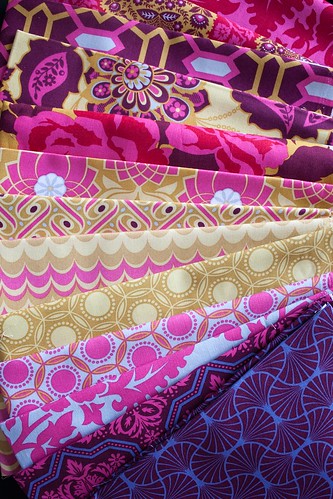
I did ask my friend to look at Design Seeds, so I could get an idea of whether or not the palette I had chosen was way off the mark. Here are a few she chose (click on the photo to go to the Design Seeds post):


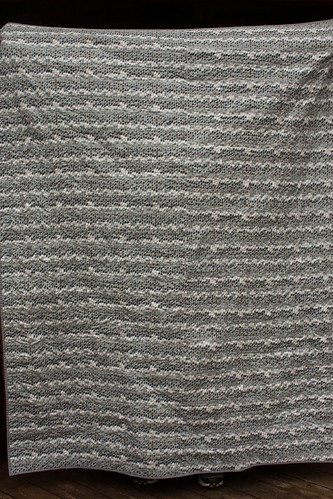
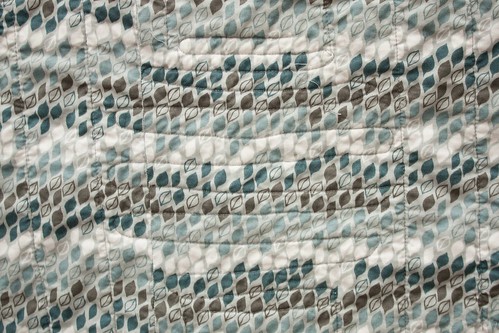
Their house is full of warm toned neutrals and the quilt definitely came out on the cool side, but I think the palette reflects some of the colors she was drawn to. And it's a palette that works for men and women. The backing is a Studio E fabric with little leaves in white, grey, blue, and brown that I thought worked well with the front.

My Better Half-Backing

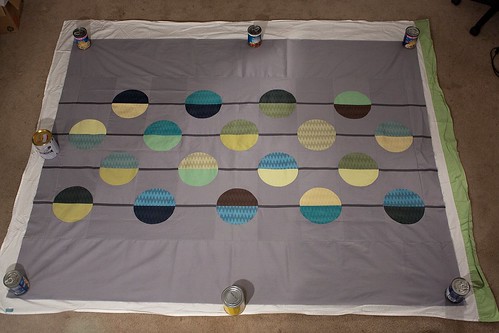
Basting and quilting. I basted on my carpet floor after vacuuming like crazy (my dog is a shedding machine!). I laid down an old sheet and then used cans and eventually a few hand-weights to keep the layers taut. My October Birthday Surprise was not quite smooth enough, so I really wanted this one to be better.

My Better Half-WIP

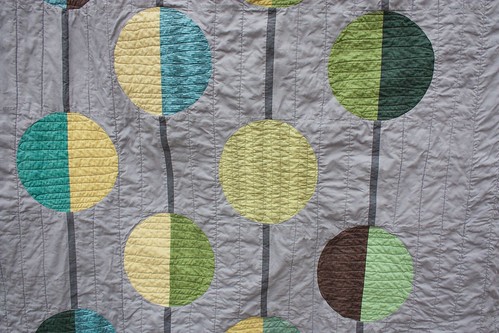
I spray basted using June Tailor because that's what I can get at Joann's. You can see in the photos how nice and flat the center portion is and how much wavier the sides are. I think the adhesive didn't hold quite as well as I'd have liked. But I think most of the waviness is due to the fact that the lines are continuous, whereas the lines in the center are interrupted by the "beads," so the lines are shorter and didn't pull as much on the fabric.

My Better Half quilt

I did some OK free motion quilting in the circles, using a basic wavy line. The stitch length varies, but overall I was really happy with the effect. [Front and back]

My Better Half quilt - detail My Better Half-backing detail

The original pattern calls for you to cut off half of the blocks on either edge of the quilt to make the design look like it continues "off the page" so to speak. After piecing all of those half circles, there was no way I was cutting four of them in half :) So, I just extended the string pieces and made the binding out of the background fabric to give it a little of what Ringle and Kerr were talking about. I decided to go with 2.25" strips for the binding to make it a little thinner than I normally do. I think this quilt could fit a twin sized bed, but I really just made it so two people could sit on the couch and snuggle under it :)

I really like this pattern and I could see it also being done with full circles using Dale Flemings six minute circles (which I have heard take more than six minutes), if you wanted the circles to be of the same fabrics. Or even doing some raw edge applique would give a similar effect. Yet again, a pattern I'd love to revisit, but there are so many quilts to make out there and so little time... I'm not sure if I ever will :)

Bride and groom received the quilt happily and I hope they enjoy it!

Tuesday, November 22, 2011

I Sewed Something!

Fabric box


["I have sewn something"?]

I've been fairly productive recently. (Wonder if it's because my husband was out of town for a whole week...) I have almost finished my December Surprise! I have two sides left to bind, but it is pieced, basted, and quilted. Can't wait to share it in a couple of weeks! I've also cut out almost all of the pieces of the diaper bag project. I'm trying to decide how to modify the straps and create an inset zipper, which the original pattern doesn't call for but which my friend would prefer. I've found a few methods and tutorials. I know Lisa Lam from U-Handblog fame, suggests taking the zipper apart. But I'm not sure I want to go that far. Speaking of Lisa, it's finally my turn to check out the Handbag Bible from the library! Gotta get over there before Turkey Day.

Here's what I actually finished:

Fabric box

A misshapen fabric box! (Fabric is home dec weight from Ikea.)

It's getting chilly here in Wisconsin and I had to pull out the gloves, mittens, hats, and scarves but we didn't have any place to put them. I was going to run out to Target and grab one of those fabric cubes/baskets. And then it occurred to me that I should just make one since I had all of the supplies. It was an exception to my deadline-projects-only rule. I didn't take too much time with it. I actually used scrap fabric, scraps of various types of interfacing, and I used up a bunch of bobbins with different colors of thread. It's far from perfect but it is fully serviceable :)

Fabric box


In an afternoon I had a place to put our cold-weather items (which evidently smell delicious). I think a false bottom would probably help to keep its shape better, but I'm over it. Plus, I saved myself a couple bucks! Actually, probably more, since I can never leave Target without spending $50 even when I have one thing on my list :)

Vintage Sheet


I also thrifted my first vintage sheet this weekend (care of the Goodwill)! Jeni has shared her considerable knowledge about vintage sheets on her blog, In Color Order (she has a lot of other great info, as well!). This is a twin and it was $1.99. I plan to use a portion as backing for my Dream On quilt (the line is inspired by vintage textiles, after all), once I get it fully put together. I went solely by look and feel, but the tag is still attached and it is one of the brands Jeni mentions in her post (plus it's the tell-tale cotton/poly blend and soooo soft!). I'm curious to see how it sews up.

Vintage Sheet

Looking forward to getting on to some new projects (and back to others). My deadline for the diaper bag and surprise quilt is December 1st, but I feel like I'm on a good pace.

Happy Thanksgiving, everyone! Hope you enjoy the day with your loved-ones.

Friday, November 11, 2011

Blog Diet Experiment

I decided to put myself on a blog diet. Not because I don't like blogs, but because I like them too much. I spend more time reading blogs than sewing, these days. And I am drowning in "must-have" fabric. (I used to not know a Moda from a Kona! Name a fabric designer? Couldn't have!)

I suspect obsessive blog-following is not a problem for most people, but I am a half-time telecommuter who is home alone a lot. So, I have more time to blog cruise than the average person.

So how many blogs are we talking about? A couple... More than a few... Ok, 177 of them. (I'm sorry, I should have told you to sit down first.) Yes, one hundred and seventy seven. 177 wonderful, rich, inspiring, helpful blogs. Basically, "too many"!

My blog diet means: for my own blog/journal, I am going to commit myself to posting about process, progress, and setbacks to keep the focus on the work, rather than the goods (e.g., purchases, stash shots - fabric porn, if I may be so vulgar). As far as other folks' blogs, I have to pare them down to a manageable number, in part to go from being a rapt but inactive observer, to an inspired, more active participant. And in part, to limit my exposure to the ubiquitous enticement to buy.

We'll see how it goes. Quilt Market recaps are brutal. But I'm down to about 40 quilty/sewing blogs and that's a good start. I culled my Facebook page, my Twitter account (which I intend to close following the end of the TwitterB in January), and my quilt shop email newsletter subscriptions and I've stopped obsessively entering giveaways.

Monday, November 7, 2011

So Little Sewing...

December Surprise Sample Block

Oh my, where has the time gone? I haven't really been doing much sewing at all. Just getting back into the swing of working outside the house (i.e., not in my pajamas!). (For my primary job, I telecommute, so what I am wearing is usually incidental to the work :))

All I have to make note of for the last couple weeks is a little bit of progress on my December surprise. You know how the proverbial "they" always tell you to make a sample block first, before you cut out all your pieces? I never do that. Well, almost never. I did it for this project (that's the one, up there) and I'm glad that I did because I made a mistake and I squared my background fabric to the template, which was wrong, wrong, wrong. Good thing it was just a sample!

December Surprise WIP

The main problem I'm encountering (aside from lacking time and motivation) is curved piecing. I'm new to it. Finding my 1/4" seam is vital to these blocks and I seem to be a bit all over the place resulting in rectangular blocks that bulge at the end with the inset half-circle. My machine, being old and discontinued, does not have a 1/4" foot. I have a generic one for it but it doesn't rest on the plate of the machine and sometimes it just falls off! So I use a satin foot and move my needle to approximately 1/4" from the right edge of the foot. But I've got 36 half circles to do, so I suspect by #36 I'll have it down. For the time being, I have to rip a few seams.

It's a tale as old as time, no?

Diaper bag fabrics

My second project, which is sitting patiently waiting for me, is a diaper bag. I have the fabric, the notions, the pattern, my proposed alterations, and yet... there it sits. It's always this way. I have three other quilts I'd like to start, but time is ticking on my deadlines and I won't let myself start anything else before I finish these two projects. (Well, I did allow myself to open the Terrain charm pack that Kate Spain herself sent me, just so I could ooh and ahh over the colors.)

Terrain charms

I only have the one charm packs and I was initially thinking about doing this quilt and then I thought about some sort of disappearing nine-patch layout, but I kinda just like them in asymmetrical groupings and a lot of negative space... I think I might go that route if ever I finish the projects above!

As for my blog diet, I'm still refining my thoughts and the scope of the experiment, but I'll probably toss up a post in the next day or so. I initially drafted it on October 21st, so it's been percolating since then. So far, I've had mixed results :)

Thursday, October 27, 2011

Hash Marks Featured!

The Kansas City Modern Quilt Guild

My Project Modern Challenge 4 entry is the KCMQG Inspiration of the Week.

Thanks so much to the Kansas City Modern Quilt Guild! Your members are an inspiration to us all!

Tuesday, October 25, 2011

Charity Stockings and a Fabric Glut

Joel Dewberry's Heirloom

Here are my stockings for the Purple Panda Quilt's stocking drive! They are intended for kids of all ages. I made one with fusible fleece, so I didn't quilt it. The stripy one is lined with batting, so I quilted it in gold and red thread along the diagonal stripes. The third stocking I used some pre-quilted fabric that my mother-in-law gave me for the interior, so I quilted straight lines in gold thread to connect it to the exterior fabric. It's for the boy or girl who likes a little sparkle in their stocking! They are each lined, so there are no exposed seams.

Stocking1 Stocking3 Stocking2 

I will try to get those out in the mail at the end of this week. Lyanna works with foster kids and they usually get brown paper bag stockings, but this year she is collecting handmade cloth ones. She is accepting stockings up until December 1st, so if you have time to stitch one up, I'm sure she would appreciate it!

And now for some blatant consumerism, brought to you by me, of course, and in part, by Hancock's of Paducah.


Heirloom kit pattern

I bought this quilt kit last week. I don't actually plan to make the included quilt pattern, I just wanted to get ahold of the fabric which includes all the prints from...

Heirloom - Sapphire Heirloom - Citrine Heirloom - Ruby

Joel Dewberry's Heirloom! The colors are awesome. (Photos: Sapphire, Citrine, and Ruby colorways.)

Heirloom - Citrine2

I especially love the Citrine colorway. Gorgeous colors. I'm a total orange convert!

The kit consists of the following straight cuts (selvedge to selvedge):18 cuts of 3/8 yard (13.5") each, 18 cuts of 1/3 yard (12") each, 1 cut at 5/8 yards, 1 cut at 7/8 yards, and 1 cut at 1.5 yards. These are the three prints of the larger cuts:

Heirloom border and binding

And what did I tell myself in justification - 'but, it was on sale...' Today, I also received the fabric from fabric.com to make my friends' diaper bag. Oh, and last week I received these beautiful Konas that I swapped for a jelly roll that had been languishing in my stash. I am loving the swapping! Swapping good - buying, bad.

Konas from Swap

Due to this binge, I am pondering a blog diet or a blog fast (hopefully contributing to a fabric diet/fast)... More thoughts on that later this week.