
[Caution! Loooong, wordy post ahead!]
As I have mentioned numerous times, I have several projects to do for the baby. Fortunately, I have a little time (knock on wood!) and I needed to get the holiday shuffle out of the way before getting to them. A while back, I got it into my head to make my hospital bag (I don't know why!). I've had the Studio Cherie duffel pattern for quite a while. You can get the pattern from Cherie at her etsy store or buy it from your local Joann's or wherever you buy Simplicity patterns (Simplicity 2274). I started about three weeks ago and let it sit over the holidays.
I had almost everything I needed in my stash. In the end, I had to buy a little bit of interfacing to finish it up, but that was it!
I did a lot of internet searching for reviews and tips before I started. I found the most helpful to be from knottygnome, In Color Order, Sew Chatty, and Spontaneous Threads. If you are interested in the pattern at all, definitely check out their posts and Google either "Studio Cherie duffel" or "Simplicity 2274" for other photos and a few blog posts. For what it's worth, here are my (very wordy) thoughts and alterations. Here's the finished product:
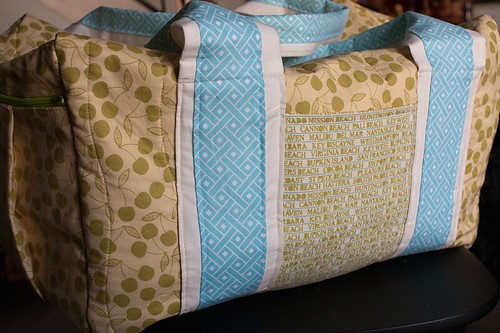
I don't think that this is a particularly difficult bag. But like most bag construction, there are a lot of steps and there's a lot of prep work to measure, mark, and cut out each piece of fabric and then likewise with the interfacing (if you choose to use it). I think it could be done in a dedicated weekend, but splitting it up over several weekends is nice, too. Also, people note that it's a large bag. And it is - it's a duffel bag. So, it's not a purse or a tote or even a big Amy Butler style shopper. It's like a big, gym-sized duffel bag. Except a lot cuter because you're using your own precious fabric!
Pattern (generally) - All the pieces, except for the pulls used in the pattern, are rectangles. So, you can cut out the pattern pieces if you like working with those or you can just measure the rectangles and use your rotary cutter. Either way, be sure to transfer all of the markings. Being lazy, I did that for most things, but I decided to forgo it with the end pockets.
- I cut all the quilted pieces about 2" bigger than called for, as suggested by Jeni (In Color Order).
- I ended up doing something different for the pulls, so I didn't even need that particular pattern piece.
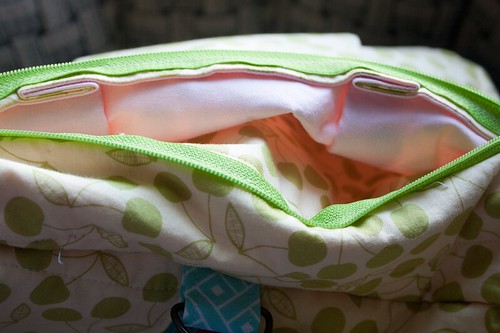
- The bag is not lined and I chose not to add one. (knottygnome has some good tips if you would like to.) I did finish the edges by zigzagging them (I seem to have broken my overlock foot, but zigzagging worked out just fine). I finished the edges before I constructed the bag to avoid bulk issues. If you have a serger, this would be a great time to use it. I think it really finishes the bag nicely without using more fabric.
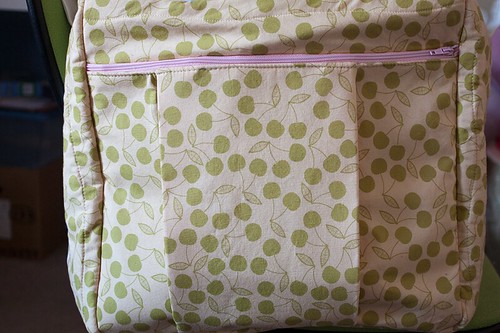
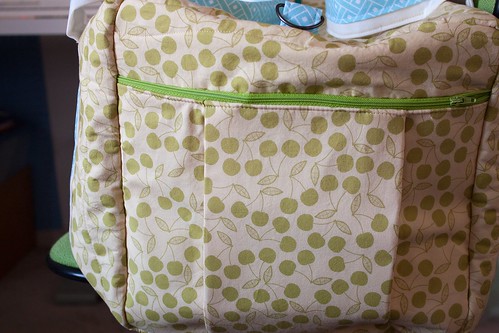
- I added another folded pocket to the back/front (the pattern calls for one). And I added another zippered side pocket. The pattern calls for one.
- I top-stitched the main zipper and the zippers in the pockets.
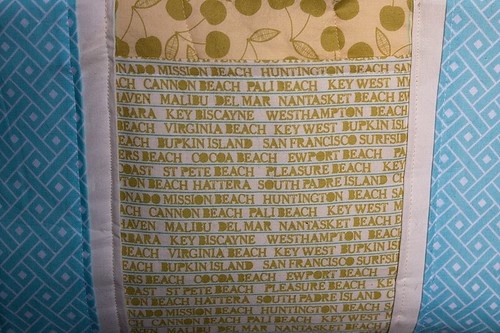
Fabric - Instead of having a lining, the pattern calls for printed fabric (for the outside of the bag) and "muslin" for the inside/backing. For the muslin, I used some 100% cotton pink broadcloth I had lying around. I like to have a lighter color for the inside of bags. I just think it helps to see everything inside when the bag is open. I also don't like to use anything too precious to me for the inside of bags. I might if I were making a swap bag for someone who has an appreciation for a particular fabric. But for the most part, I like to use a solid or a cotton print that isn't one of my super-favorite favorites.
I used quilting weight cotton for the outer fabric. I've been saving these Cosmo Cricket green cherries for something special! The pattern suggests home dec weight.
This is a very bulky part to go over, since it's the main body, the facing, the zipper and the pull. Just sew slowly!

Batting - I don't keep polyester batting on hand, which the pattern suggests to help the bag keep its shape. Instead, I fused Pellon Thermolam fusible fleece to the outer fabric and used some lightweight fusible interfacing on the muslin/inner fabric. I thought between the fleece and the interfacing that the bag would have enough body to hold its shape and mostly it does, without being too stiff.
Quilting - as noted above depending on how you are going to quilt your bag, it might be helpful to cut your front, muslin, and batting a little larger than the pattern. If you are going to quilt densely, you might need a little more wiggle room, as your pieces will shrink with tighter quilting. I did some organic lines, similar to the ones on the pattern. But I didn't mark them from the pattern.
Pockets - I interfaced all four pockets for a little more stability. I used what I had, which was Pellon Craft-Fuse.
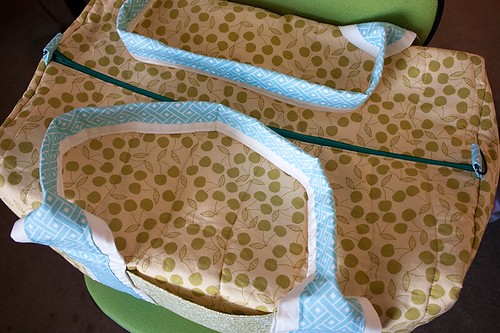
This might seem slightly convoluted (photo below), but it will make sense if you've read the pattern: If you follow the pattern the edges of the zippered pocket connected to the zipper are unfinished. So, I added 1/2" to the long edge of the zippered pocket (both outer and inner fabric) pieces. Before pleating, I interfaced the muslin and right sides together, I sewed across the long edge of both fabrics. Turned them wrong sides together, pressed and basted unfinished edges. That way, the part that is sewn to the zipper is finished and stray threads won't get stuck in the zipper. Of course, this adds bulk to the end project. If you interface the pockets, don't interface the top 3/4" (where the zipper seem will be) to cut down on as much bulk as possible.
This was the most challenging part for me because my end pieces (with the zippered pockets) were just a titch bigger than the ends of the bag. But I fudged and pulled and pushed and ba-da-bing, ba-da-boom - they're in there!
Straps - The pattern calls for a base layer of jute, which is really cute and I'm sure, quite sturdy. But I didn't have any, so I followed knottygnome's ideas for the straps (cut 3 strips 8"xWOF and make to strips of 62"; sew into a tube; fuse 3.5" of fusible fleece or interfacing to each tube and turn right-side out). I made mine out of Kona Snow and a print (a Dear Stella Basketweave). You could just as easily make narrower straps or use a ribbon, webbing, or cotton tape. Just remember that you will see the inside/back of the strap at the handle, so something finished would be your best bet.
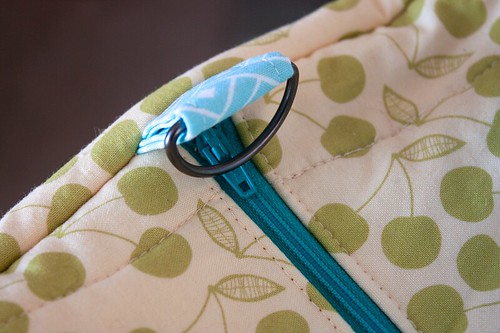
Pulls - Instead of cutting out the pulls from the pattern, I cut two pieces of 2.5"x4", fused lightweight interfacing them, pressed the edges to the center and then in half again to get a piece that was 2.5"x1". Then I added a D-ring to each. This way, I can add a shoulder strap later if I want.
Final thoughts: Know thy machine. I actually only lost one needle in this process and it was at the very end. My machine doesn't like when I use jeans needles. It tends to skip stitches. So, I used a universal size 12 for the whole she-bang. It also does not like bulk, but it does have a setting to change the presser foot pressure, which is helpful. I previously broke my walking foot (yes, I am hard on my machine!), so I used my usual foot, which is a satin stitch foot.

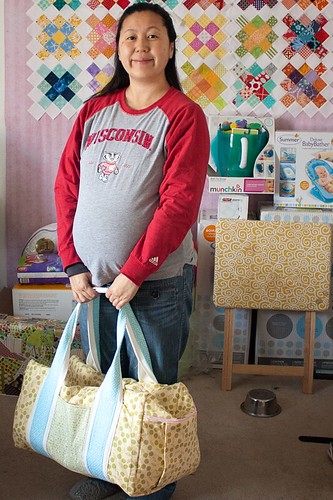
I'm really happy with this bag. And I actually have fabric to make two more! I don't need two more duffels, but they might be good gifts for someone very, very special (this isn't a bag you give to just anyone!). But after next week's last pre-baby visit to Minnesota, I have to get back to the baby projects because she'll be here in no time!
Happy New Year to all! May your best sewing be yet to come!
4 comments:
The bag looks great....good luck with the baby.
beautiful bag! yours turned out great.
I have made 4 of these bags so far and have another 3-4 planned. I used Duckcloth for the exterior, Canvas for the handles, broadcloth of the liners, and parka zippers. I measured all of the pieces and cut them using my quilting mat and rotary cutter. I cut the exterior and lining pieces 2” larger than the pattern piece to allow for fabric shifting and quilting shrinkage. I quilted a 1.5 inch diamonds using painter’s tape to make mark my sewing lines. A walking foot is totally necessary. I used a regular presser foot for the 1st bag and was totally frustrated. I purchased a walking foot the next three bag; so much better. I used fusible fleece on the body and side panels. I added interface to the side pieces, strap pocket, and side pocket. I replaced the tabs with D-ring loops (for a future shoulder strap). I added side pockets to each side and strap pockets on each side. I finished the side zippers between the side pocket exterior and lining fabric. I did add a liner to the bags (makes it look more professional). I did not use the jute webbing. I cut 2 8”x58” strips from Canvas. I folded the strap in half and then half again; then ironed 2” fusible fleece to the strap. I topstitched the strap. I will add a piece of plastic to the bottom of the bag for stability.
I made a No Guts Boxie Pouch to go along with 1 of the bags. [http://www.craftsy.com/pattern/sewing/accessory/no-guts-boxie-pouch/13424]
[http://www.flickr.com/photos/98339709@N03/sets/72157634925076906/with/9431869479/]
Thank you for sharing these wonderful tips. Your bag is gorgeous. I'm going to be tackling my first duffle soon!
Post a Comment